Hiển thị các bài đăng có nhãn Tech Tricks. Hiển thị tất cả bài đăng

Thứ Sáu, 2 tháng 11, 2018

How to Transfer Text/Files/Photos/Videos between Phone to PC, Phone to Phone and PC to Phone?

Transfer Text/Files/Photos/Videos between Phone to PC, Phone to Phone and PC to Phone

Have you ever come across a situation where you had to type a long text from your mobile and then you have thought of your PC where you could type very quickly? Well, now you will not face such a situation anymore.
Scroll down for Review Video (Hindi/Urdu) with Practical Examples

AirForShare (Android/iOS)

AirForShare helps you to share text, links, and files between devices/computers instantly. Once uploaded your text or file will be available for 30 minutes on any other device you use in your Wi-Fi network
With Airforshare Android/iOS Mobile App, you can (Instantly) Transfer Text/Files/Photos/Videos between Phone to PC, PC to Phone, PC to PC and even Phone to Phone.
Download AirForShare for Androidhttps://play.google.com/store/apps/details?id=com.airforshare.app
Download AirForShare for iOShttps://itunes.apple.com/us/app/airforshare/id475158919?mt=8


Transfer Text/Files/Photos/Videos between Phone to PC, Phone to Phone and PC to Phone using AirForShare

1. Open AirForShare.com in any browser.
2. Paste and Save text or upload file.
3. Start AirForShare application on your phone - you will see your content (text/file, etc) immediately.
We provide easy access to our service without passwords, cables, entering secret links or IP addresses and you don't need to download and install desktop applications. Focus on sharing!

Special Features of AirForShare

  • Need to send long text message or contact info? Type it on your computer, drop to AirForShare, and copy to clipboard instead of typing on phone keyboard.
  • Found great app and want to install it right away? Save link to AirForShare and open it from our application.
  • Took a nice picture of your friends and want to share it with all of them? Find any Wi-Fi and upload it from the app, your friends may access your photo using any device or smartphone they have.
  • Instantly put and get files, open files with other apps on your device or upload to AirForShare
All you need is to connect to the same Wi-Fi network. If you are at home or office you may be connected already and this step is not even required!

Important Things to Keep in Mind

  • Your content is available for 30 minutes since last access, it will be deleted once expired automatically.
  • Any person connected to the same router may grab your data - please do not share important private information like passwords or credit card numbers unless you're using a Private Mode.
  • There is a 5MB limit/2 Files at once in the free version. With a Premium plan, share files with no limits and use Private Mode. Or create a free account and extend your limits to 10MB/5 Files at once.

(Video) ⚡(Instantly) Transfer Text/Files/Photos/Videos between Phone to PC and PC to Phone [Urdu/Hindi]

READ NEXT: 

The Quickest and Latest Way to Transfer Photos from Mobile to PC/Laptop


Thứ Bảy, 29 tháng 9, 2018

Rooting Android Phones - Advantages & Disadvantages

To Root or Not to Root an Android Phone - That is the Question

If you've done any internet searching on the topic of Android phones, you've most likely run across either forums or articles discussing "rooting" your device. This article is not intended to show you how to root your phone or to convince you whether or not to root it. This is an impartial summary of the advantages and disadvantages of rooting an Android phone.

Scroll Down for Video

Your Android smartphone can do a lot, but you can add even more functionality if you root your smartphone. Benefits include installing and uninstalling any apps you want, controlling the deepest sub-settings in your phone, and enabling features restricted by your carrier, such as tethering. Before you dive into the world of rooting, you need to know what the risks are, and the best way to root your phone safely without losing any data.

The information in this article should apply no matter who is the manufacturer of your Android phone: Samsung, Google, Huawei, Xiaomi, LG,etc.

What Is Rooting?

To Root or Not to Root an Android Phone


The Android phone that you love and enjoy is running an operating system that was designed for commercial and private use. Like most any operating system, several features have been disabled, either for future use or to prevent a casual user from causing permanent damage to the operating system. Rooting, also known as jailbreaking, is the process in which limitations are removed and full access to the operating system is allowed. Once rooted, the Android phone owner has more control over many of the settings, features, and performance of the phone. Basically, rooting means to get to the root of the operating system and to have the ability to make global changes.

To add more, Rooting is the process that lets you access all the settings and sub-settings in your phone. It's similar to having administrative access to your PC or Mac, where you can install software, remove unwanted programs, and tinker to your heart's delight. On your phone, this means you can remove preloaded apps from your phone's carrier or its manufacturers, such as backup apps, sponsored apps and the like. Then you can make room for apps you'll use, and possibly speed up your phone and save battery life while you're at it. And if you decide rooting isn't for you, it's relatively easy to unroot it.

Advantages and Disadvantages of Rooting

Well, there are both advantages and disadvantages of rooting. The end result depends upon WHY YOU ARE ROOTING YOUR PHONE. So, let's begin with the Disadvantages of Rooting

Disadvantages of Rooting Your Phone

There are two primary disadvantages to rooting an Android phone:

Rooting immediately voids your phone's warranty

After they are rooted, most phones cannot be serviced under warranty.

Rooting involves the risk of "bricking" your phone

A bricked phone is no better than carrying around a brick in your pocket. The phone is dead and unusable that is, it no longer boots up. Combine that with the first disadvantage, and you have a now-useless phone that cannot be repaired under warranty. Well, this is unlikely to happen if you follow rooting instructions closely, but still something to consider.

Other potential disadvantages, though less severe, are worthy of consideration:

Poor performance

Although the intention of rooting a phone is to improve the phone's performance, some users have found that, in their attempts to speed up the phone or add additional features, the phones lost both performance speed and features.

Viruses

Even phones can get viruses. A common practice that people do with rooted phones is to flash their ROMs with custom programs. Whenever you make changes to the software code, you run the risk of introducing a virus.

Other Risks involved with Rooting

Rooting your phone may also block access to some apps. Developers may block rooted phones from downloading their apps for security and copyright reasons or typically for security or DRM (digital rights management) concerns

SEE AlSO: Top 10 Android Pro Tips | Get Most of your Android Smartphone

Advantages of Rooting an Android Phone

Rooting your Android phone offers benefits that including:

Running special apps

Rooting allows the phone to run apps that it cannot run otherwise. There are many apps designed just for rooted phones that help you improve performance, block spam, hide ads and backup everything on your phone. You can also download batch app removers so you can get rid of all your bloatware in one fell swoop. And many of these apps can even be found in the Google Play Store.

Want to use your smartphone as a Wi-Fi hotspot? Some carriers, like Verizon, block this function unless you sign up for a particular plan. Rooting your phone can unlock this features at no extra cost.
You can also download an in-depth backup, ad-blocking, and security apps.

Removing pre-installed apps

Removing pre-installed apps from the phone. Unless you have a Google Pixel or Google Nexus smartphone, it's likely there are apps on your phone that you never installed. These unwanted apps are often referred to as bloatware since it takes up space and can slow down the performance of your phone. Examples of bloatware include apps from companies that have an agreement with your wireless carrier, such as the NFL, or carrier-branded apps for music, backup, and other functions.

Unlike apps you've chosen to download, these apps cannot be uninstalled—unless you have a rooted smartphone.

Freeing up memory

When you install an app on your phone, it is stored in the phone's memory. Rooting allows you to move installed applications to your SD card, thus freeing up system memory for additional files or apps.

Custom ROMs

This is the most powerful feature of rooted phones. There are hundreds of custom ROMs that can do anything from speeding up the processing speed of your phone to changing the entire look and feel of the phone.

You can replace the Android OS that came pre-installed and replaces it with another one

Once you root your smartphone, you can access custom ROMs, such as Paranoid Android and LineageOS. A custom ROM will have an attractive and clean interface as well as a myriad of customization options including color schemes, screen layouts, and more.

To Root or Not to Root?

The decision to root your Android phone is one that should not be rushed into. Though the allure of having an unlocked phone is powerful, having a bricked phone is no fun at all. 

Still, you are determined to root your android smartphone, always have a backup plan. Also, If you do choose to root, you can always reverse it if you have any regrets. And, as a gift for your rooted devices, here is a list of The best 24 Apps for Rooted Android Devices.

Via Lifewire

(Video) Rooting Android Phones - Advantages & Disadvantages


LUCKY READER: If you have a Samsung Galaxy Note 5, then you are in Safe Hands. Here is how you can Root your Note 5.

READ NEXT: How to Restore Mobile Deleted Data without Backup?

Thứ Sáu, 28 tháng 9, 2018

How to Recover Deleted Texts From A Phone?

We’ve all deleted something important and then needed it, or damaged our phone and lost crucial data. Unfortunately, sometimes this happens to our text messages, and if you’ve got an Android, it may be very difficult to get them back. Here's what you can attempt to salvage them, and more importantly, what you can do to keep it from happening again.


Recover Deleted Texts From A Phone (Android)

When you delete something, Android marks it to be "overwritten" with new data. Think of it like erasing something from your to-do list with a pencil being able to write something new in the same space.

Important Things to Do

First, you need to try and preserve the data. If you’ve just deleted the messages, put your phone into airplane mode immediately. This will shut off the Wi-Fi and the cellular radio so you won’t download any new information. You also shouldn’t use the camera, record audio, or otherwise create any new data that might potentially overwrite the messages.


Once that’s done, you should check to see if the relevant data you need has already been kept elsewhere. For example, photos are sometimes automatically backed up to your phone’s Gallery app, and appointments are sometimes automatically added to your calendar. If there’s a relevant app for the information you need, check that first.

If you’re in regular contact with the person whose messages you lost, they may have the conversation backed up on their phone and can forward it to you. Just explain the situation and ask them to forward the relevant messages to you.

If all else fails, and you've backed up your phone completely before you deleted the messages using a full-phone SMS backup app such as SMS Backup & Restore or  Ultimate Backup, or other such apps in Google Play you can try wiping and restoring your phone.

Keep it in mind if you have already installed Apps like SMS Backup & Restore then it becomes really easy to recover deleted text from a phon.

Here comes the main part, if the above steps don’t work, then there’s no easy way to restore the messages with software.

SEE ALSO: Top#3 Best New Features in Chrome 69 | 10th Anniversary Update


(With Software) Recover Deleted Texts From A Phone

If wiping and restoring the phone is out of the question, you can turn to PC-based software.
There are plenty of “Android data recovery” applications out there, from companies who aren’t affiliated with Google. While the quality of these applications varies widely depending on the company, there are a few consistent factors with these apps.

These softwares may be able to recover your text messages, among other deleted data, if the data hasn't already been overwritten. All these apps will do is find the data marked for deletion and you can decide to remove it or not.

In most of the cases, they require you to “root” your phone. Think of “root” as the person who has all the keys to a building and the permission to go anywhere and do anything in it. Rooting your phone will likely void the warranty on your phone and may cause other problems.

Lastly, you will have to pay for the software. So you have to weigh the value of retrieving your text messages against what you pay for the software, the risk of voiding your warranty, and the uncertain results.

If you do decide to go the software route, DiskDigger is a popular app that doesn’t require you to root your phone, although that may limit the software’s effect. But whether you go to software, or simply ask for a new text, this is one case where an ounce of prevention is worth a pound of cure.

SEE ALSO: How to Identify Unknown Numbers on WhatsApp/Viber/Telegram/Line?

Backing Up Your Messages

If you have a relatively new Android phone, backing up your text messages is simple. First, check to see if your phone has Google Drive installed. If not, you can find it in the Google Play store; open the store and search for “Google Drive.” It’ll be a free download. You can choose to buy more storage if you want, but it won’t be necessary for our purposes.

Once Google Drive is downloaded, open it, sign in if you need to use the name and password you use for your Gmail if necessary, and click the three lines in the upper left-hand corner. Then choose settings, and select “Google Backup.”

Recover Deleted Texts From A Phone

This will open a menu, and then select “SMS messages.” If Google Drive came pre-installed on your phone, it’ll already be backing up your messages, but otherwise, simply enable it and that will preserve texts. However, you won't have long; Google Drive updates its backup every 12 to 24 hours, so if a message is deleted, restore it immediately.

Recover Deleted Texts From A Phone

Unfortunately, this is an archive: It isn't searchable for one message and you can't restore just one. This will update your entire text history, all at once, to the previous setting. If there are any important messages you've gotten in the meantime, use the techniques below to preserve them.

Backing Up MMS and Photos

For multi-media messages, or MMS, such as photos, you’ll need to repeat this process with Google Photos, although that usually comes with your Android. However, the good news is that any photos you take, if you have Google Photos, backups have been enabled for years so you might be surprised what’s already stored on there. For photos that are sent to you, you may need to download a third-party app such as Save MMS, which will do it automatically.

If you really want to cover your bases, you can also screenshot important messages, which will be saved automatically by Google Photos. On any Android phone operating system 4.0 or above (which is almost any phone released since 2011), hold the power button and the volume down button at the same time, and it’ll snap a photo of your screen. It’s a “quick and dirty” way to back up important messages when you’re rushed for time, or only need to back up a handful of messages.

If you want a full-featured tool that doesn't involve messing with your phone, try Helium, which uses your desktop computer and can preserve specific messages, as well as data from your whole Android. There are other such apps available in Google Play Store so do read the reviews and ratings prior going for any app.

This ounce of prevention will go a long way towards preserving your text history and keeping the messages you want properly recorded. And it’ll also ensure you hang onto everything you snap.

Via Lifewire

READ NEXT: First Blogger (Blogspot) Google Adsense Earning (with PROOF)

Chủ Nhật, 16 tháng 9, 2018

How to Identify Unknown Numbers on WhatsApp/Viber/Telegram/Line?

Identify Unknown Numbers on WhatsApp

I am sure you get WhatsApp Text/Photos/Videos and other media from unknown WhatsApp Senders. Wondering how to know the name of the sender? Here you are. Here I'll tell you two ways by which you can Identify Unknown Numbers on WhatsApp.

Scroll Down for Video

First Method

All you need to do is to open your WhatsApp. Locate the unknown sender. Click on it and again click on its Number (at the top). See below photo.

Identify Unknown WhatsApp Number
Image: Tech Urdu YouTube

Ok, once you click on the number, a new window opens. Now, below the number, you see some information about the sender (depends upon what the sender has set for himself/herself. Most often, the sender's name or his/her nickname will be visible here. As you can see in the image below.

Identify Unknown WhatsApp Number 1 
Image: Tech Urdu YouTube

SEE ALSO: Google Maps' LIVE Popular Times Feature Saves Your Time


Second Method

In case you’re a Truecaller user and want to auto-search unknown numbers on Truecaller, here’s how you go about it:

How to Auto-search on WhatsApp Using Truecaller

1. Open Truecaller, tap on the Hamburger Menu (on Top Left) and select ‘Settings’


Identify Unknown WhatsApp Number with True Caller App 
Image: Tech Urdu YouTube

2. Choose the ‘General’ option

Identify Unknown WhatsApp Number with True Caller App 1 
Image: Tech Urdu YouTube

3. Toggle on ‘Messaging Apps’


Identify Unknown WhatsApp Number with True Caller App 2 
Image: Tech Urdu YouTube

That’s it! You’ll now be able to auto-search on messaging apps using Truecaller. The setting works on WhatsApp, Line, Viber, and Telegram.

TrueCaller (Free) Download Link

https://play.google.com/store/apps/details?id=com.truecaller

(Video) How to Identify Unknown Numbers on WhatsApp/Viber/Telegram/Line?


READ NEXT: How does GPS work on Phone?


Thứ Năm, 6 tháng 9, 2018

Top#3 Best New Features in Chrome 69 | 10th Anniversary Update

The 10th Anniversary of Chrome

It’s been ten years since Chrome was first released. A lot has changed since then. To mark the 10th anniversary of its Chrome browser, Google is rolling out a substantial refresh of the browser, giving it a softer, rounder look and some neat new features.

Best New Features in Chrome 69

The first thing you'll observe is the change in the overall look and design of the Browser. Chrome’s aesthetic overhaul also makes tabs easier to read by making each site’s icon more prominent. The rounded corner around tabs and new clear and crisp layout.

Chrome 69 Latest Features improvement in design
Image: Tech Urdu YouTube Video

In Chrome 69 there’s support for Web Developers and normal users. If we talk about web-developers, these are the prominent improvements:
  • CSS Scroll Snapping
  • Support for notches
  • Web locks
  • New CSS4 features
Well, here we are not covering the features stated above, rather we'll be talking about those features a normal user uses. So, here are Top#3 Best New Features in Chrome 69.


Big Improvement in Search Bar

Improvement in Search Bar Chrome 69
Image: Tech Urdu YouTube Video

This one is cool. Chrome now presents search results for common queries (such as the weather) in the search bar, so you don’t even have to click through to a second page to find the answer. Just type weather (no need to press Enter) and you'll see the result right away. Try for other such daily usage terms and let me know in comments below which terms worked for you. For now, try “How long is Incredibles 2?”

Tab Search in the “Omnibox”

Have you ever had so many tabs open that you couldn’t find the article or conversation you were looking for, forcing you to systematically close tabs to search for the needle in the haystack that is your digital life?

To help us all find that which we’ve saved and lost in our browsers, Google has given Chrome the ability to find specific web pages via its Omnibox (the address bar). Simply type the website or page name and select “Switch to Tab” to discover what you lost!

Chrome 69 Latest Features Omni Tab Feature
Image: Tech Urdu YouTube Video

Let's try the other way. How would you search for an article on Particular Website? 1) Open Google 2) Type Website Name .... wait until website opens 3) Search for the Search Tab of Website 4) Enter Your Query and Press Enter to get results.

In the latest update, all you need to do is 1) Type website name 2) Press Tab 3) Type your Query and Press Enter. You'are right away to your desired results. Bingo!!

Chrome 69 Latest Features Omni Tab Feature 1
Image: Tech Urdu YouTube Video

Password Generator

I’m surprisingly excited about this one.

Chrome 69 Latest Features Strong Password Generator

Image: Tech Urdu YouTube

Chrome can now make your passwords in addition to storing them—the most substantial feature in this update, I guess. The browser’s password storage and autofill features now include a password managera la LastPass or 1Password, which makes it a lot easier to use longer, better passwords by default.

So next time when you are signing up for a service (or registering), chrome will suggest you Strong Password.

Chrome 69 Latest Features Strong Password Generator 1
Image: Tech Urdu YouTube

Ops!! That is a really tough Password to remember. Right? Well, not to worry. Google Chrome now stores your password that you can access from Manage Passwords Tab or from your Google account (Watch below video for details).

Via Life Hacker

(VIDEO) Best New Features in Chrome 69


READ NEXT: Google Chrome Shortcuts: Incredibly Useful Shortcuts You Didn't Know.

Chủ Nhật, 26 tháng 8, 2018

How does GPS work on Phone?

How does GPS work on Phone?

One of the coolest highlights of a cutting-edge cell phone is the manner in which it can figure out where you are while you're there. This has a few drawbacks — terrible area based commercials or following your movements ring a bell — however having the capacity to see where you are, the place you should be, and precisely how to arrive is marvelous.

This enchantment happens a similar way on each smartphone from each company making them, regardless of the Operating System. Several components work together to pinpoint you (regularly with an exactness of 3-5 meters!) and the software can astutely pick the most ideal approach to get it going.

SEE ALSO: Google Maps' LIVE Popular Times Feature Saves Your Time


What is GPS?


GPS stands for Global Positioning System. It's a technology owned by the U.S. government and overseen by the country's Air Force. GPS is a radio navigation system. It uses radio waves between satellites and a receiver inside your phone to provide location and time information to any software that needs to use it.

You don't need to send any real information over into space for GPS to work; you just need to have the ability to get information from at least four of the 28 satellites in orbit that are devoted for geolocation use.

Each satellite has its own internal atomic clock and sends a time-coded signal on a specific frequency. Your recipient chip figures out which satellites are visible and unhindered at that point begin gathering information from the satellites with the most grounded signals. GPS information is moderate and slow and this is by design — satellites keep running on rechargeable batteries and sending a fast signal hundreds of thousands of miles would require more power — so it'll take some moments to get your geolocation.

ALSO READ: Can a Switched Off Phone (Android/iOS) Device be Tracked?

How does Mobile GPS Work?

Your Mobile's GPS recipient utilizes the information from these signs to triangulate where you are and what time it is. Notice the word triangulation and the specify over that four satellites are required for GPS to work. The fourth signal is utilized to determine altitude so you can get your geolocation information on a map with just three signals.

GPS receivers utilize a considerable amount of power and require an unhindered perspective of different satellites to work. Obstructions can incorporate tall structures and that implies the places where the most of us live can (and does) experience difficulty getting the information it needs constantly. That is the place AGPS comes into the picture.


What is AGPS?


AGPS stands for Assisted Global Positioning System - when you want your location from your phone. As stated earlier GPS radios use a lot of power and unless they stay in constant use, it can take up to a minute each and every time you get new data. Since you usually want your location while on the move, that can be a burden.

AGPS adds cellular location data to assist geolocation.

Your phone carrier knows where you are since your phone "pings" cell towers. When you can see three or more towers the phone company can triangulate where you are. How precise this is will depend on the strength of the signal between your phone and the tower, but usually, it's good enough to be used for location data.

Software on your phone feeds this raw cellular location data to the GPS receiver which will periodically switch between GPS data and cellular location to get a very close approximation (within 50 meters or so) in real time. Whenever a true geolocation position is received from GPS satellites your location is adjusted; we've all seen the pin on a map indicating where we are snap into place once in a while and that's what's happening when it does.

AGPS does send data out of your phone, but its data that was already being sent when it checks for cell towers in range. you're not charged for this but you will need an active data plan to use AGPS.

Which is better - GPS or AGPS?

That is a simple inquiry: AGPS is the better solution most of the time. We need our mobiles to know where we are in real time, to not utilize a considerable measure of battery capacity to do it and to have the capacity to revive at whatever point the software needs it without waiting for a precise GPS lock. AGPS location isn't as exact as a genuine GPS location will be, however, it's sufficient for relatively every utilization case and the micro-adjustments that can be made with a true GPS information when it refreshes makes up for most discrepancies.

Again, as stated earlier, AGPS needs a cellular connection. That means there are cases where GPS is preferred. Any time you have no data connection you'll be unable to use cellular-assisted GPS. The same goes when you don't have enough cell towers in range of your phone. Most apps that require location also require a data connection, but some, like Geocaching apps, live on your phone's storage and will work while you're off the beaten path looking for hidden treasure.

To get the best of both worlds, make sure you've enabled all location options in your phone's settings and let it make the decisions for you!

Location Method - Tech Urdu

Via Android Central
This article was originally published here.

READ NEXT: 10 Tips, Tricks & Shortcuts For Android Pro

Thứ Sáu, 17 tháng 8, 2018

How to Use Gmail CONFIDENTIAL Mode? (Pros/Cons)

Gmail Confidential Mode

One of the many features added to Gmail with its recent redesign was the Confidential Mode. It has been available on the web for quite some time, however, it is today that the feature has found its way to Android.

Scroll Down for Video

It allows senders to restrict things like forwarding, copying, and downloading the emails they send. Senders can also set emails to expire after a certain amount of time, and, in cases where extra security is necessary, lock a message with an SMS code.

Gmail for Android finally lets you send sensitive info via Confidential e-mails, without having to update the app.

Gmail Confidential Mode - Tech Urdu

How to Use Gmail Confidential Mode?

On Mobile Devices

Implementing confidential mode is a fairly easy process that’s similar across both Android and iOS. All you need to do is begin composing a new email, tap the more icon (three vertical dots on Android or three horizontal dots on iOS), and then select “Confidential Mode” and turn the setting on. It’s then you’ll be asked to set things like expiration dates and SMS passcodes.

Once you set the expiration date and passcode settings, you can simply write out the message and send it out right from your mobile device.

Gmail Confidential Mode - Tech Urdu

On PC/Laptops

To use it on a PC/Laptop, once you compose an email, you see a LOCK at the bottom. This will enable/disable Confidential Mode. Once you enable it, the rest of the settings are the same as stated above.

Confidential Mode - Tech Urdu

SEE ALSO: Can I Create Multiple Gmail Accounts without Mobile Number Verification?

How to change the expiration of sent emails?

Even after you’ve set an expiration date for an email, you can remove access to it early. This is done by going into your Sent folder, opening the email in question, and tapping the “Remove Access” button that appears at the bottom.

Pros of Gmail Confidential Mode

  • It’s a handy tool if you’re sending information you’re afraid of leaking out or personal details that recipients should only need access to for a limited amount of time.
  • If you send an email in confidential mode, any attachments that go along with it will be restricted as well. That means that recipient won’t be able to download any sensitive photos or documents you might send, so this will certainly have its uses for those in the business world as well.

Cons of Gmail Confidential Mode

  • Confidential mode can’t prevent recipients from taking a screenshot of your email – and indeed, might not be able to prevent devices with malicious software from downloading the content of your email – it still offers a layer of protection when sending sensitive messages.

(Video) Gmail Confidential Mode


Via Slash Gear

READ NEXT: Track & Measure Website Success with Set Goals

Chủ Nhật, 5 tháng 8, 2018

Google Maps' LIVE Popular Times Feature Saves Your Time

Google Maps' LIVE Popular Times Feature

There's a new feature in Google Maps that can spare you a huge amount of time on the off chance that you utilize it legitimately. It shows you how bustling a place like an eatery or store regularly is, and if there's generally a holdup time before you even go.

Scroll Down for Video

How to Use Google Maps' LIVE Popular Times Feature?

First, open Google Maps on your phone/PC and search for any location you want to visit, like a restaurant or a store, and then tap on it. Scroll down past the phone number, website, description and all that added information. Stop right here, where it says "Popular Times."

Google Maps Live location Feature - Forestrypedia

Now, check out the diagram. You can tap at different times to perceive how bustling a specific place is a certain time. On the off chance that you tap the name of the day, there's a drop-down menu that gives you a chance to change to perceive how popular a place is on various times of the week, as well. It will tell you, in real time, how busy a place currently is.

For restaurants, it typically says you can expect to wait 15 minutes, 30 minutes, an hour, or more if it's busy.

For places like the DMV or Doctor, it doesn't always give you an exact wait time, but it says things like "it's as busy as it gets," so you can plan your schedule accordingly.

Google Maps' LIVE Popular Times Feature Saves Your Time


See Also: TOP 10 LATEST & AWESOME GOOGLE MAPS TIPS & TRICKS 

Thứ Bảy, 28 tháng 7, 2018

Google Adsense Matched Content for Blogger/Blogspot/Website - Tech Urdu

Increasing Blog/Website Views and Earnings

Well, I'm sure when you are reading this post then you have a blog on Blogspot or Blogger or a Website (on Wordpress). And, yes you are interested as you want to increase your site's views, increase retention and decrease bounce rate and ultimately earn more from your blog. Alright, you are on the right post.

Google Adsense Matched Content for Blogger/Blogspot/Website

Recently, Google introduced a new system of Advertising called the Matched Content. It is a free service that advances pertinent or relevant or matched content from your site to your guests/visitors and can build your online visits and the time your readers spend on your site. Note that you can't make a Matched content unit by altering the ad sort of a current ad unit.

Adsense Matched Content - Tech Urdu

As per Adsense, Matched content recommendations are based on topic similarity and are personalized for the reader. Our experiments show that on average Matched Content recommendations increase the number of pages viewed by 9% and the time spent on site by 10%. See this Inside AdSense blog post for more information: Matched content: designed to engage your users and increase visitor duration.

See Also: [With Proof] How to earn from Auto-Blogging using Adsense (Blogger/Blogspot)


Adsense Matched Content - Tech Urdu

With Matched content units, you pick the pages where you'd like the proposals to show up, at that point AdSense advances the articles on your site that are most significant to the readers of those pages.

Some important things to know about Matched content units

Adsense explains the Matched Content Units as follows:
  • They bring relevant content to the attention of your users, which can help increase page views and time on site.
  • You can place Matched content units on any of the pages on your eligible sites (not every site monetized with Adsense is eligible for Matched Content).
  • Recommendations are within-site, for example, if you have two sites abc.com and xyz.com, then the recommendations we generate for each site will be internal to that site. Note that we only generate recommendations from pages that have Google ads or Matched content units on them.
  • These units work on mobile, tablet, and desktop.
  • For sites where the majority of articles don't have an image, Matched content units will display in a text-only format.
  • The AdSense program policies still apply to pages containing Matched content units.


Which Blogger/Blogspot/Websites are Eligible for Matched Content?

Matched content is accessible to selected publishers (not every Publisher having a site monetized with Adsense is eligible for Matched Content). To utilize Matched Content, you should have a site that meets Adsense base necessities for visiting volume and number of one of the unique pages. Adsense, then, set up these necessities to guarantee that Matched content gives an awesome ordeal to your guests.

How to Check which Sites are Eligible for Matched Content?

Well, as stated earlier, if your sites are good enough to get some good views, then your site can be eligible for Matched Content.

Believe it or not, one of my AutoBlogging Blogger site/blog has become eligible for Matched Content (only because it is getting good views).

Now, if you are wondering how to get you Autoblog eligible for Adsense Monetization and then for Matched Content, then you should check this post.

Coming back to the point, so there are two ways by which you can check whether your site/blog is eligible or not.

First Methods:

Open Adsense -> Settings -> My Sites -> Matched Content

Matched Content Adsense 1 - Tech Urdu

Here you'll see all your sites eligible for Matched Content. If you see nothing, it means none of your sites are eligible for Matched Content. So, go back to your blog/website and keep your efforts up and check back after a couple of days.

Second Method

Open your Adsense -> My Ads -> Ad Units -> New Ad Unit -> Select Matched Content

Adsense Matched Content - Tech Urdu

On, Top Right you see a drop-down list of all your sites/blogs Eligible for Matched Content. Select the desired blog/site and proceed with the basic settings to get the ad unit code.


Matched Content - Settings - Tech Urdu

Give your ad unit a name. Select style, size, etc. Save and Get Code.
Copy and paste the code between the <body> and </body>tags of your page, on one of your eligible sites.

Matched Content - Ad Unit Code - Tech Urdu

Keep it in mind, placing the code outside the <body> tags will prevent your ads from appearing correctly.

See Also: How to Move Large Blogger Backup File to WordPress? (Step-by-Step)


Adding Matched Content Code on Blogger/Blogspot

To add the ad unit in a blogger/blogspot, go to Layout -> Go to Page Body -> Click on any Add a Gadget -> Select HTML/JAVA Script -> Give a name of this Ad Unit (like Matched Content) and Paste you Ad Unit Code in the Content Area and Save -> Drage this under the Page Body Blog Posts -> Save Arrangements.

Matched Content - adding ad unit on a blog - Tech Urdu

Important to note: It can take 20-30 minutes for the ad to appear on the page. At first, the ad might show as a normal text & display ads, but it will soon be replaced by a native ad.

Adding Matched Content Code on Wordpress Blog/Website

To add the ad unit code, Go to Dashboard -> Appearance -> Widgets -> Create a New (Custom HTML) Widget -> Paste the Ad Unit Code -> Drag this under the Blog Post -> Save and you are good to go. ALSO, Appearance -> Editor -> Paste the Code in the Body Tag.

After 20-30 Minutes, you'll start seeing Matched Contents on your Blog/Website.

Matched Content - Blogger - Tech Urdu

Important Note

When monetizing your Matched content units, be aware that:
  • Ads will show only when appropriate ads are available.
  • Sites containing text only (or mostly text), Matched Content Units will be served as Text Ads.
  • Ads will replace some of the recommendations in your Matched content unit.
  • Smaller Matched content units with only one recommendation slot will not show ads.
  • Ads will be styled to complement the look and feel of your content recommendations.
  • You can track the revenue generated by the ads in your Matched content unit by viewing the Ad units report on your Performance reports tab.

Courtesy: Adsense

Thứ Năm, 26 tháng 7, 2018

03 Ways to Secure your Blog/Wordpress Website?

How to Secure your Blog/Wordpress Website?

HTTPS appropriation has surged in the course of recent years, for the most part on account of the accessibility of free SSL/TLS certifications. Browser vendors have also been encouraging sites to switch to HTTPS, and Google said earlier this year that Chrome would eventually mark all HTTP-only sites as 'Not Secure.'

Secure Site - Tech Urdu

Scroll Down for Video (in Hindi/Urdu)


What is HTTPS 'Secure' Certification?'

The Hypertext Transfer Protocol (HTTP) is an application protocol for distributed, collaborative, and hypermedia information systems. HTTP is the foundation of data communication for the World Wide Web. Hypertext is structured text that uses logical links (hyperlinks) between nodes containing text.

HTTPS ensures the connection between you and the site you're visiting is secure, meaning the content cannot be tampered with by your ISP or government. Beyond that, most newer browser features (like Service Workers, which allow sites to send notifications) are blocked on insecure connections.

See Also: How to Create Your Digital Smart Business Card?

Chrome will Display all HTTP Sites as 'Not Secure'

Chrome 68 is expected to be launched on July 24, 2018, and it's the main release that will show a 'Not secure' message in the address bar on HTTP pages. Chrome as of now shows the message on HTTP destinations with information section fields, however beginning tomorrow, all non-secure pages will be disgraced (a sample has been shown below).

Not Secure - Chrome - Tech Urdu

The change is critical in light of the fact that it will add additional weight for locales to help HTTPS (in the event that they haven't as of now)

The message will also bring attention to sites that have not configured HTTPS correctly. For example, CloudFlare says that around 157,000 major sites don't automatically redirect HTTP pages to the HTTPS version.

How to Secure your Blog / Wordpress Website?

There are numerous methods to do so. By doing 'so, I mean from HTTP to HTTPS. The primary is the browse vendors or simply the domain and hosting providers. A couple of weeks ago, on one of my websites, I got a mail from my Service Provider and they let me know of this in advance and ultimately helped me to go through this problem. Well, these are the easiest methods to do so for both a blogspot site and WordPress or other blogs/websites.

For WordPress Blogs/Websites - Using SSL Certificate Plugin for Wordpress Websites/Blogs.

Well, if you are using a WordPress site, then you have a bunch of plugins. Well, the one I recommend is Really Simple SSL (its usage is as simple as its name is). Just install it and activate it. You have some options to tweak with which you can do by going into its settings.

Secure your Blog/Wordpress Website - SSL Plugins - Tech Urdu

Really Simple SSL automatically detects your settings and configures your website to run over HTTPS. The entire site will move to SSL.

What Really Simple SSL Plugin Actually does?

  • The plugin handles most issues that WordPress has with SSL, like when you’re behind a reverse proxy/load balancer, or when no headers are passed which WordPress can use to detect SSL.
  • All incoming requests are redirected to https. Default with an internal WordPress redirect, but you can also enable a .htaccess redirect.
  • The site URL and home URL are changed to https.
  • Your insecure content is fixed by replacing all HTTP:// URLs with HTTPS://, except hyperlinks to other domains. Dynamically, so no database changes are made (except for the siteurl and homeurl).

For Blogger (Blogspot.com) Blogs

Blogspot is a secure platform for bloggers (since it has been developed by Google itself). Yet, there are some setting to do to make sure your site is Secure. If you don't employ the proper settings, your blog will look like this one:

Not Secure Blog - Tech Urdu

While, if it is a secure one, it will look like this one:

Secure Blog - Tech Urdu

Well, this little change takes a very simple setting to. All you need to do it to go to your blogger -> settings -> basic -> here you see HTTPS keep https redirect YES. Keep in mind If HTTPS Redirect is turned on, Visitors to your blog will always go to https. 


https redirect - tech urdu

- Sources include: Android Police


03 Ways to Secure your Blog/Wordpress Website?


Read Next: Google is Giving Away iPhoneX for $1. Know the Reality


Thứ Hai, 9 tháng 7, 2018

How to Move Large Blogger Backup File to WordPress? (Step-by-Step)

Moving from Blogger to WordPress

Working with Blogger is great. You have the free domain; free hosting and easily Google Adsense monetized forum. It is great to start blogging. However, if you want to get full control of your blog ie your own personalized domain, your personal hosting, and freedom to do anything with your blog, then you need move to self-hosted forums like WordPress.

Scroll Down to Watch Video.

Steps to follow while Moving to WordPress from Blogger.

Before we talk about what to do when moving a larger Blogger Backup file size than your WordPress allowable upload limit, let's quickly talk about how a blog can be shifter from Blogspot to WordPress?

Also Read: How to Trace Mobile Number Exact Location?

Step-1: Export your Blogger blog

Go to your Blogger -> Setting -> Others -> Back Up Content (Save the Backup on your PC)

Blogger Back Up - Tech Urdu

Step-2: Import Blogger to WordPress

Go to your WordPress Dashboard -> Tool -> Blogger (Install Plugin by clicking Install Now) -> Run Importer


Choose you Blogger Backup File -> Choose File (If Blog backup file size is less than 8 MB (in this case) then the process will be completed without any problems. But, if it is greater than 8 MB, then you need to follow the next instructions.

Import Blogger - Tech Urdu

BONUS TIPS
Once you import your blogger to WordPress, must do these steps (to get the already established Google rankings).
  • Setting up permalinks on your new WordPress blog.
  • Setting up redirects for Blogger visitors to WordPress posts
  • Set up redirects for RSS feeds
  • Import your images from Blogger to WordPress media library.


How to Move Large Blogger Backup File to WordPress?

Here comes the main question. When your file size is larger, most probably, you see such an error.

Sorry, there has been an error. File is empty. Please upload something more substantial. This error could also be caused by uploads being disabled in your php.ini or by post_max_size.

Well, find below my three methods by which you can increase your file size and then import your Blogger data to WordPress.

Method No. 1

This method needs some steps to follow.
Go to you CPanel -> wp-admin -> Create a New File

Cpanel - Tech Urdu

Create a New File (with name php.ini).

php.ini - Tech Urdu

Locate php.ini file -> Click it -> Edit -> Insert the following Code (The size in upto) -> Save Changes. (You are done here)

Upload Max - Tech Urdu

Method No. 2

Once you complete Method No. 1, you need to wait at least 15 to 20 Minutes. Go to your Blog Importer and you will see whether the default upload size has been increased or not. Just in case it does not work for you, then you can try Method No. 2.

This method is almost the same as Method No. 1 with ONLY ONE CHANGE. Just rename that php.ini file php5.ini


php 5 - Tech Urdu

Well, after waiting again for another 10 to `15 Minutes and still no response (which is quite irritating), then you need to apply the next method.


Method No. 3

In this method, we will be installing a WordPress Plugin. To install the Plugin, go to Plugins -> Add New


Search Tuxedo Big File Uploads. Install and Activate it. (You can also find other good plugins for the same purpose)


Once you install and activate it. You'll be amazed to see that your default file size has increased up to 682 GB.


Tuxedo WordPress Plugin - Tech Urdu

So now Choose Your Blogger Backup File - Upload and Import.

Bonus Method

Just in case none of the above methods work, it means your Blogger Importer Plugin is not working fine. Then, you need to install another Plugin Blogger Importer Extended. This Plugin is multi-purpose and it will hopefully solve your problem.

Blogger Importer Extended - Tech Urdu

Quick Note:

You must be wondering that Plugins are easy to install and operate so why I stated above two methods which to some extent needs some extra steps to do. The Answer is by following Method 1 and 2, you can set your own limit. Also, you don't need to install any Plugins (as Plugins not only take some space but also slow your site overall performance).

How to Move Large Blogger Backup File to WordPress? Tutorial Video (Urdu/Hindi)


So let me know in comments below which method worked for you. Also, you can share your own methods with us. We are always open to suggestions and improvements.

Thứ Tư, 20 tháng 6, 2018

Can a a Switched Off Phone (Android/iOS) Device be Tracked?

Tracking a Phone

Tracking a phone or a number, in past, was considered the work can only be done by the Police or Secret Services. But, nowadays, due to the latest technology in the approach of everyone tracking a phone is much easier now. Prior discussing how to track a switched off phone, let's talk about how can you track any android/iOS phone if it is not switched off. This will help in understanding the whole phenomenon and later will help us tracking a lost smartphone.

Can a a Switched Off Phone (Android/iOS) Device be Tracked? - Tech Urdu

Tracking a Lost Android Phone

Most Android Phones now come with Android Device Manager built in. This service will automatically track your phone's location, so if it ever goes missing you can hop on your laptop or a friend's phone and find it's last known location, ring your phone if it's nearby and you need a hint or lock and/or erase your phone if you fear it has been stolen.

All this Android device manager, iCloud, antivirus with Anti-theft features like remote erase, take pictures of the thief, location history, etc only work if the phone is Switched on, Location Enabled (on) and Connected to Internet.

Before we talk about tracking a switched off phone, you should make sure that, if in case, you lose your phone you should make some basic settings. The most important thing you can do is make sure your phone is set up to be found before it goes missing. Otherwise, you're basically on your own.

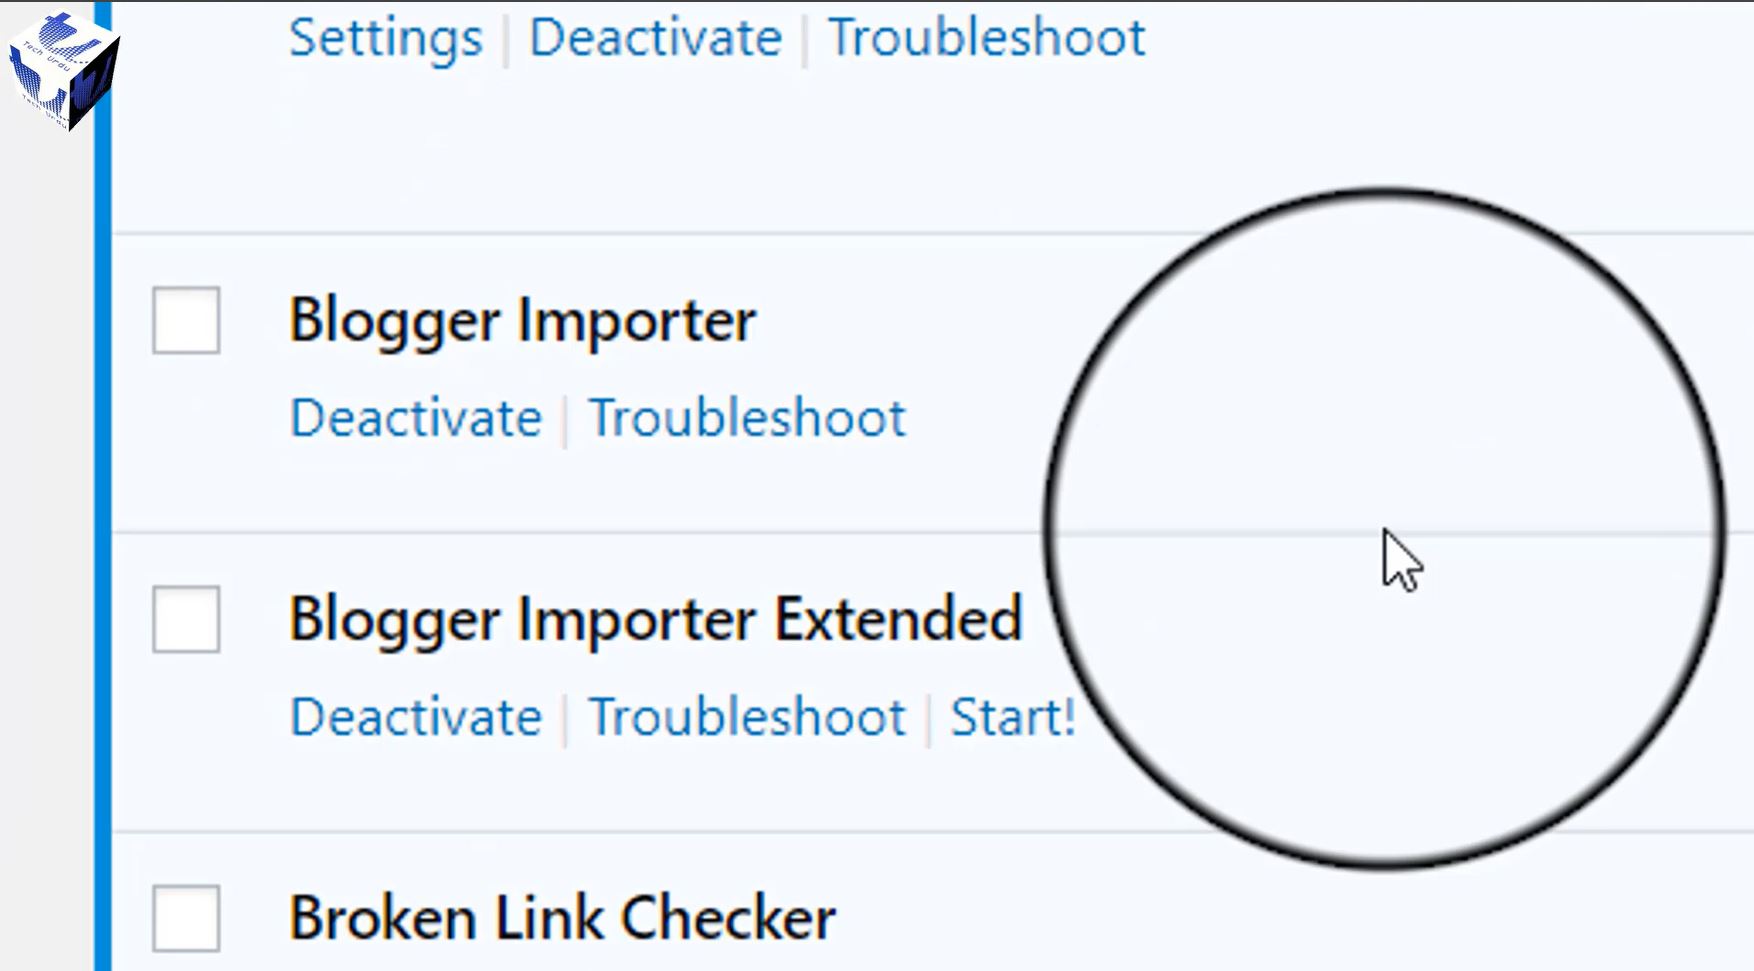
See Also: PTA Launches DIRBS - The System to Block Stolen, Smuggled Phones

How to enable Android Device Manager on your phone?

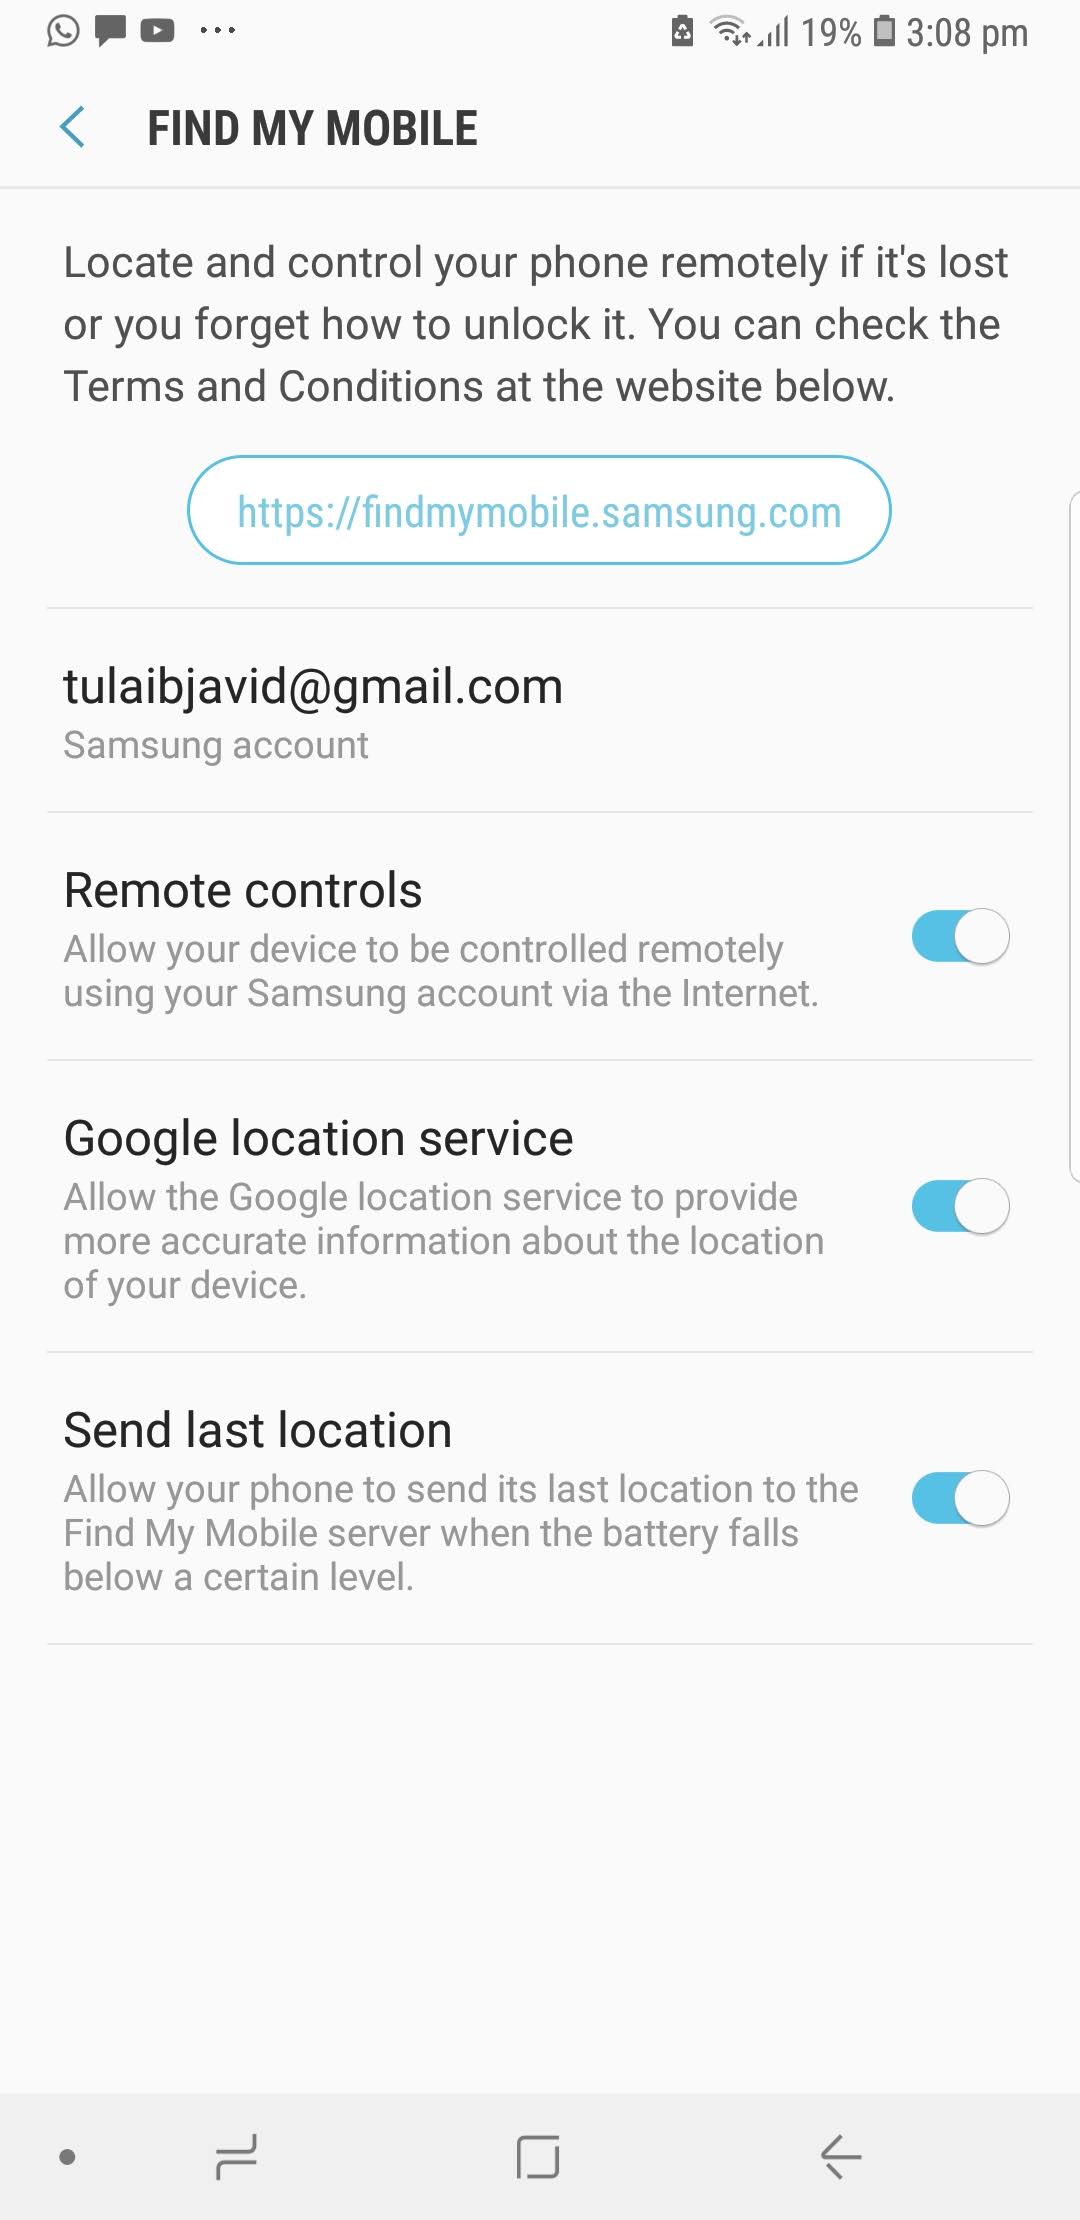
In newer Android phones, the Device Manager is already located conveniently in your Settings app -> Lock Screen and Security -> Find My Mobile (the settings can be changed in different phones).

Tracking a switched off phone - tech urdu 
Locate Android Device Manager or Find My Phone


Tracking a switched off phone - Tech Urdu 
Find My Mobile - Enable all options[/caption]

But if you can't find it you can always download Android Device Manager from the Google Play Store. This locating service has essentially amalgamated with Google to make finding your phone easier.

Android Phone Tracking Settings

There are just a couple of things you'll need to activate (again these settings can vary from manufacturer to manufacturer).
  1. Launch Settings.
  2. Tap Security.
  3. Tap Device Administration.
  4. Tap Android Device Manager so that a checkmark appears in the checkbox.
  5. Tap the back button in the top left corner of your screen.
  6. Tap the back button again in the top left corner to return to the main Settings menu.
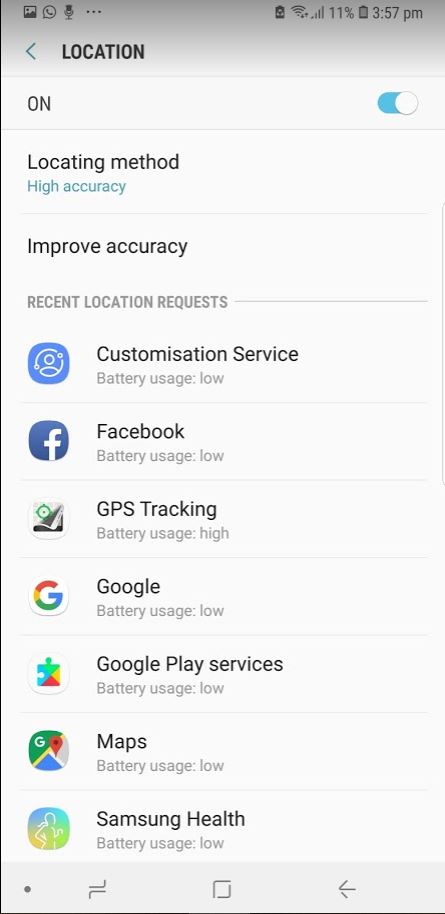
  7. Tap Location in the main Settings menu.
  8. Tap the switch beside Location at the top of the screen so that it turns on.
  9. Tap Mode.
  10. Tap High accuracy so the circle is filled in.
  11. Tap the back button in the top left corner.
  12. Tap Google Location History.
  13. Tap the switch beneath Location History so that it turns on.
  14. Tap the switch beside your device so that it turns on.

Location Settings - Tech Urdu 
Location Settings

 
Always Choose - High Accuracy

Location History - Tech Urdu 
Location History - Enable it and Select your Desired Phone

See Also: Can I Create Multiple Gmail Accounts without Mobile Number Verification?

Locating Lost Android Phone from PC/Laptop

Should you happen to lose your phone, you can locate its whereabouts by logging into your Google account from any computer or even from another phone.
  1. Launch a web browser from a phone, tablet, or computer.
  2. Navigate to Google if it is not your default search engine or homepage.
  3. Type find my phone (android) in the Google search bar.
  4. Tap on Android Device Manager (usually the first option in the search).
  5. Enter your email address and password just as though you were checking your email. If you have 2-step verification set up on your Google account (and you most certainly should), you'll need to complete that process as well.

Find My Phone-Google - Tech Urdu

When your phone is located, you have three options to choose from:
  • You can Ring your phone so that it makes noise (even if you had it on silent). This feature is helpful if the map indicates that the phone is within earshot and you simply can't see it.
  • You can Lock your phone so that the finder can't access your home screen. This feature is most helpful if your phone wasn't previously secured with a passcode or a fingerprint sensor.
  • You can Erase your phone. This is the best option if you know for certain that you aren't likely to retrieve your phone.
If you are trying to locate your phone with Android Device Manager and it doesn't seem to be working, the most likely cause is that your phone is not currently connected to Wi-Fi or an available network (so whenever going out keep your data on - as a security measure). In case your phone is not connected to any network, it's important to keep trying; the moment your phone does make that connection, it will appear on the map.

Tracking Lost Android Phone using 'Google Maps location history'
You can use Google Maps to track your phone, in the event it is turned off or disconnected from the internet. All you need is to have Location Reporting and Location History activated on your device (as discussed earlier). Just use your Google account through a web browser to access the Location History feature, make sure the current time frame is selected, and you can see the last location your phone pinged.

If the phone is turned off or disconnected, it won’t show you any real-time results, but it’s the next best thing in case you dropped your phone in a busy market or in a public transport and its battery died. It can also be useful to notice movement patterns, which could be your thief’s home or workplace. All you need to do is:

Log into your Google account (the one your phone is registered with).
Open up google maps in PC/Phone and go to your timeline:
https://www.google.com/maps/timeline
This will show minute by minute location of your phone on any chosen day.

Location Timeline History Google - Tech Urdu

If you want to download a tracking app instead, there are a number of options to choose from the Play Store. Wheres MyDroid App, for instance, serves the same purpose.

Check this out: How do I know My Phone is Hacked?

Tracking Lost Android Phone  that has not been registered with G-mail

When a phone that is not connected to any Gmail Account either it has been reset or brand new, then such phones can't be tracked using Android Device Manager or FInd My Phone option.

The only option that remains with a normal user (not Forces) is to track your phone using IMEI Number of it (if you have it). But, if you don't have that IMEI Number then forget about it. If your phone has some insurance of any stuff like that, claim and buy a new phone.


Tracking a Lost iPhone, iPad, iPod touch, or Mac

Any iPhone or iOS device can also be found by Find My iPhone (iOS) services.

Find my iPhone - Tech Urdu

If you misplace your iPhone, iPad, iPod touch, or Mac, the Find My iPhone app will let you use any iOS device to find it and protect your data. Simply install this free app, open it, and sign in with the Apple ID you use for iCloud. Find My iPhone will help you locate your missing device on a map, remotely lock it, play a sound, display a message, or erase all the data on it.

For missing iOS devices, Find My iPhone also includes Lost Mode. Lost Mode locks your device with a passcode and can display a custom message and contact phone number right on the Lock Screen. While in Lost Mode, your device can keep track of where it has been and report back so you can view its recent location history, right from the Find My iPhone app.

Navigate to the “Find My iPhone button on your dashboard, and select the device you want to locate. This may take a little while, so be patient.

Once it shows your phone location on the map, you have the option to make the phone ring, in case you’ve just lost it around your house or workplace, activate “Lost mode”, or erase your data. Make sure you don’t jump the gun on that third option because, once you erase your data, Find my iPhone won’t work anymore.

The important thing is that the thief can’t disconnect your phone from iCloud services, turn off Find My iPhone or erase your data, if you’re using iOS7 or higher. Thanks to Activation lock, which only lets you do any of those things once you input your Apple ID password.

However, they can turn off your data and WiFi, thereby negating the location service. Since they can’t erase the phone or turn off location services, you can ask Apple to notify you the next time they go online (of course they will go online sooner or later), so you don’t need to have Find My iPhone open all day.

Please note that Find My iPhone must be enabled in iCloud settings on your device before you can locate it with this app.

Track and find your missing Apple device

When you turn on Find My iPhone, iCloud can help you get your missing device back. And if your device is ever lost or stolen, Activation Lock keeps your information safe and makes it hard for anyone to use or sell it. Click here to proceed.

Do you know: How Antivirus Software Can Be Turned Into a Tool for Spying?

Tracking a Switched Off Phone

Here comes the Big Question now. When you turn off your phone, it will stop communicating with nearby cell towers and can be traced only to the location it was in when it was powered down. GPS will be of no help as it consistently needs cellular and/or internet access to gather the location details. In simple words, the phone can't be tracked. Still, you don't want to quit, here is a way for you.

Problems with the Switched Off Phone

As soon your phone is lost or theft by a thief. They keep the device off and sell it for parts. Some ship stole phones to other countries after wiping the current software and IMEI tracking request will never find the phone active in a different country. There are even smarter ones who tamper with IMEI number, so IMEI tracking won't work and wipe the phone so all software tracking is gone.

Can a Switched Off (Android/iOS) Phone be Tracked?

So a switched off phone cannot be tracked down, only last location can be found out till it was on. The last location may or may not help depending on your situation. You have two options left now.

  1. Hope that your phone is turned on and connected with Internet. As soon as it does, this is the time to catch your thief.
    • Well, in the case of iPhones, it is more secure and the phone becomes completely useless for the thief (if you have set things right as guided above). So when he gets connected to the Internet, you'll be notified instantly.
    • The case of Android varies due to different operators and OS versions. Yet, it does almost the same. If you have set up things right as discussed earlier, then there are chances to find your phone or its location. Becuase, when it gets connected with internet, its location history is updated and that is your chance (if your phone is locked or secured with fingerprint/facial recognition/password, etc then a normal thief can't delete/erase your Gmail ID and you can get to him.
  2. The second thing you need to do is to report your phone to the Police/Forces, etc who solve such matters. Provide them with your phone IMEI and other details they ask. Chances are they can track the phone even if it is turned off.

How does NAS/Police/FIA, etc Track Powered Off Phones?

Organizations like National Security Agency, Central Security Service, Police and other intelligence services, according to a report from Washington Post, are capable of tracking cell phones even when they are turned off. And this isn’t something new. As per the report, NSA has been using this technique, dubbed “The Find”, ever since September 2004. This technique was used in Iraq and it helped identify “thousands of new targets, including members of a burgeoning al-Qaeda-sponsored insurgency in Iraq,” according to a special operation officer who was interviewed by Post.

The Washington Post story doesn’t throw light on this. But the only way NSA could track switched off phones must be by infecting the handsets with Trojans. That would force the handsets to continue emitting a signal even if the phone is in standby mode unless the battery is removed. When the battery is removed, the compromised handset will not have a power source to emit the signals, and hence would fail to share its location details.

But infecting the phones to track its location isn’t something new. Back in 2006, CNET had reported how The Federal Bureau of Investigation (FBI) had deployed spyware to infect suspects’ mobile phones and record data even when they were turned off. It’s quite plausible that NSA used similar techniques in Iraq, albeit on a larger scale.

Robert David Graham of Errata Security points out to the intricacies of the terms “off”, “track”, and “phone”. “The best way to track an ‘off’ phone is to — secretly — by installing a chip, connected to the phone’s battery,” says, Graham. “Thus, even when the phone is ‘off,’ that added chip would still be ‘on.’

In this case, it’s not really the phone itself that’s being tracked, but that chip.“. In layman terms, this should probably explain why USA banned Chinese networking companies like Huawei and ZTE.

Popular Posts

Được tạo bởi Blogger.

Featured Post

Portland Man Pleads Guilty to Cyberstalking and Anonymous Telephone Harassment

PORTLAND, Ore.—On June 24, 2019, Bob Ibenne Ugwa, 50, of Portland, pleaded guilty to cyberstalking and anonymous telecommunications harassme...

Nhãn